
raw wasm: making a maze race, part 1
Raw wasm
For the past year or so, I've been making fun little demos that I've written in WebAssembly. Unlike most other assembly languages, WebAssembly wasn't designed to be written by hand, and it shows — there are a lot of things that make it frustrating for a person to write. On the other hand, just like other assembly languages, the fact that it's hard to do makes it fun!
The first demo I made like this was a doomfire demo, which uses the technique described in Fabien Sanglard's blog. It is all contained in a single HTML file, including the contents of the WebAssembly binary file, stored as an array of bytes.
I didn't write the binary by hand, instead I wrote using the WebAssembly text
format (.wat), and used the wat2wasm tool to convert it. The text
format uses an s-expression-like format, but otherwise doesn't work much
like lisp. Here's a brief snippet from the doomfire demo:
(func $setup
  (local $i i32)

  ;; Fill bottom row with color 36, (R=0xff, G=0xff, B=0xff).
  (local.set $i (i32.const 320))
  (loop
    ;; memory[53440 - 1 + i] = 36
    (i32.store8 offset=53439 (local.get $i) (i32.const 36))
    ;; loop if --i != 0
    (br_if 0
      (local.tee $i (i32.sub (local.get $i) (i32.const 1))))))
This function is run once at the beginning, and fills the bottom of the screen with the color 36, which is all white. The fire is drawn from bottom to top, fading from bright white, through to yellows, and oranges, then reds, dark reds, and finally to black. Again, take a look at Fabien's blog for more details.
The relevant part for us is how WebAssembly looks. You can see a single loop,
a local index variable $i, writing a byte to memory with the i32.store8
instruction, and performing a conditional branch with the br_if instruction.
The code written above is equivalent to the following C-like code, hinted at by the comments:
void setup() {
  uint32_t i = 320;
  do {
    memory[53440 - 1 + i] = 36;
  } while(--i != 0);
}
The magic number 53440 here is the bottom row of pixels, where each pixel here is a palette index (not the final RGBA color). The WebAssembly memory layout for this demo is described in the source code above:
;; 5 pages * 64KiB bytes per page:
;; [0, 53760)       => firePixels, 1 byte per pixel.
;; [53760, 268800)  => canvasData, 4 bytes per pixel.
;; [268800, 268948) => Palette data, RGBA.
(memory (export "mem") 5)
Unlike other assembly languages, the WebAssembly text format doesn't allow you to provide nice names for memory locations. So you'll have to use raw numbers instead.
This demo has one more function to update the flames, which runs once per
frame in a requestAnimationFrame callback. The final .wat file is 107
lines, of code. Converting this from text to binary produces a 398 byte .wasm
file, which I've embedded directly into the HTML. Here's the final result:
I made this demo back in May. After I did, my colleague Bill told me I should call it "raw" wasm, which I thought was a fun name. Since then, I've made a few other demos:
- A metaball demo in 452 bytes
- A raytracer with 4 spheres, 1 light, reflections and shadows in 1486 bytes
- A snake-like game, but with 360° rotation in 1976 bytes
You can find the source for all of these demos on GitHub in my raw-wasm repo. Just a warning though: I do this just for fun; real WebAssembly shouldn't be written by hand!
Colin Eberhardt even joined in to make one, loosely based on my metaball demo!
Just for fun - here's a funky interference pattern hand coded in WebAssembly https://t.co/hbu9axEvtT
— Colin Eberhardt (@ColinEberhardt) May 15, 2019
Inspired by https://t.co/lXqFnP3d5t from @binjimint / @torch2424 - and with the help of Aer Lingus and my flight delay 😭 pic.twitter.com/F36m109MJ2
For each of the demos, I made some rules for myself. I could import a few
helpful functions from JavaScript (Math.sin, Math.random), but it would be
cheating to use JavaScript for more than that. In general, I tried to make the
files as small as I could, without sacrificing too much readability. Each demo
has a run() function that expects to be called once per frame. They may have
other exported functions too, and the names of those are fair game (often I'll
export them as the empty string, which saves some bytes).
Usually after I finished a demo, I'd spend some time trying to make them a little smaller, until I hit a goal ("less than 2000 bytes!") or I got bored. Usually, a few weeks later, I'd get inspired again and work on the next one.
What's next?
I finished the snake game back in June as part of a hack day with my friend Aaron (who made an awesome wasm matrix demo that day!).
Super overdue on my Saturday Hack Day project, but here it is! 👍🏾
— Aaron Turner (@torch2424) May 16, 2019
What if I told you #AssemblyScript has WASI bindings, and Wasmer's new WAPM is a great for it? 🤔
So I built the matrix for #webassembly 😎🖥️🎉
`wapm install -g torch2424/wasm-matrix`https://t.co/cecBCdt8sw pic.twitter.com/vwVCvYP9Bu
Each of my demos was getting more complex (and larger), and I wasn't sure what I'd do next. My colleague Wouter suggested I make a little Wolfenstein 3D-like demo. I have a copy of Fabien Sanglard's Game Engine Black Book on Wolfenstein 3D, so this seemed like a pretty good idea. But I didn't have much time to work on it until earlier this month.
Maze Race
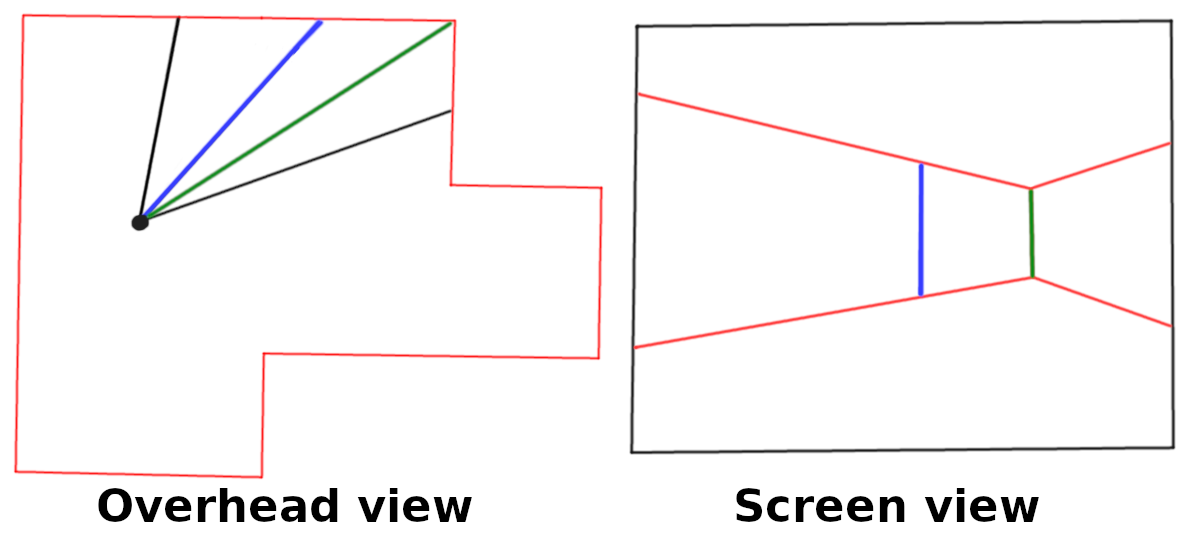
To make a Wolfenstein-like renderer, you do the following: For each column (i.e. x-coordinate) of the screen, you fire a ray into the scene to find the first wall you hit. When you hit a wall, you record the distance to it. To draw the wall, you draw a vertical strip. The height of this strip is inversely proportional to the distance to the wall. This way a distant wall is drawn smaller than a close wall.
Wolfenstein uses a trick to make this fast on old machines. Since each wall is in a grid, we can find which wall we hit by stepping to each grid edge, and finding the first grid cell that contains a wall.
I could have done it this way, but machines are so fast these days, it isn't really necessary. All we need to do is find an intersection between a ray (for a given column of the screen) and a line segment (an infinitely thin wall). This requires one divide, but that's not too expensive. Even if we brute-force test every ray of a 320x240 screen against 100 walls, that's still just 32000 intersection tests, which is easy for a modern machine.
Step 1: Ray-Line Segment Intersection
I started off by implementing an intersection test between a ray and a line segment. Instead of doing the math myself, I took the equation from rootllama's blog:
$$ \begin{array}{lcl} t_1 &=& \displaystyle\frac{|\textbf{v}_2 \times \textbf{v}_1|}{\textbf{v}_2 \cdot \textbf{v}_3} \\ t_2 &=& \displaystyle\frac{\textbf{v}_1 \cdot \textbf{v}_3}{\textbf{v}_2 \cdot \textbf{v}_3} \end{array} $$
where
$$ \begin{array}{lcl} \textbf{v}_1 &=& \textbf{o} - \textbf{a} \\ \textbf{v}_2 &=& \textbf{b} - \textbf{a} \\ \textbf{v}_3 &=& (-\textbf{d}_y, \textbf{d}_x) \\ \end{array} $$
given a ray with origin \(\textbf{o}\) and direction \(\textbf{d}\), and a line segment with endpoints \(\textbf{a}\) and \(\textbf{b}\).
This yields two t values. \(\textbf{t}_1\) is the intersection "time" along the ray, where 0 is at the origin, and positive values are the distance in the direction of the ray. \(\textbf{t}_2\) is the intersection time on the line segment, where 0 means the ray hit the segment at \(\textbf{a}\), and 1 means the ray hit the segment at \(\textbf{b}\).
Given that, we can write this WebAssembly code:
(local $v1x f32)
(local $v1y f32)
(local $v2x f32)
(local $v2y f32)
(local $v3x f32)
(local $v3y f32)

;; v1 = O - a
(local.set $v1x (f32.sub (global.get $Ox) (local.get $ax)))
(local.set $v1y (f32.sub (global.get $Oy) (local.get $ay)))

;; v2 = b - a
(local.set $v2x (f32.sub (local.get $bx) (local.get $ax)))
(local.set $v2y (f32.sub (local.get $by) (local.get $ay)))

;; v3 = (-dy, dx)
(local.set $v3x (f32.neg (local.get $dy)))
(local.set $v3y (local.get $dx))
Instead of doing two divides (for \(\textbf{v}_2 \cdot \textbf{v}_3\) , we can instead take the reciprocal and multiply:
(local $inv-v2.v3 f32)
(local $t2 f32)
...
(local.set $inv-v2.v3
  (f32.div
    (f32.const 1)
    (f32.add
      (f32.mul (local.get $v2x) (local.get $v3x))
      (f32.mul (local.get $v2y) (local.get $v3y)))))

;; t2 is intersection "time" between s and e.
(local.set $t2
  (f32.mul
    (f32.add
      (f32.mul (local.get $v1x) (local.get $v3x))
      (f32.mul (local.get $v1y) (local.get $v3y)))
    (local.get $inv-v2.v3)))
It's OK if the dot product is zero; it just means that $inv-v2.v3 and $t2
will be infinity. We then check whether $t2 is between 0 and 1, inclusive. If
so, we calculate $t1 and make sure it's greater than or equal to 0.
;; t2 must be between [0, 1].
(if
  (i32.and
    (f32.ge (local.get $t2) (f32.const 0))
    (f32.le (local.get $t2) (f32.const 1)))
  (then
    ;; t1 is distance along ray.
    (local.set $t1
      (f32.mul
        (f32.sub
          (f32.mul (local.get $v2x) (local.get $v1y))
          (f32.mul (local.get $v1x) (local.get $v2y)))
        (local.get $inv-v2.v3)))
    ...
    ))
Note that the length of the cross product of \(\textbf{v}_2\) and \(\textbf{ v}_1\) (extended into 3d space) is the determinant of the matrix made from those vectors:
$$ |\textbf{v}_2 \times \textbf{v}_1| = \det{\begin{vmatrix} {v_2}_x & {v_1}_x \\ {v_2}_y & {v_1}_y \end{vmatrix} } = {{v_2}_x}{{v_1}_y} - {{v_1}_x}{{v_2}_y} $$
$t1 is the distance along the ray, so we can divide the screen height by this
value to get the height of the wall. This means that a wall that is one unit
away will be as tall as the screen. Here, I use half of the screen height (120
pixels) instead, which means $height will be half of the wall height. This is
done so we can measure from the middle of the screen.
(local.set $height
  (i32.trunc_f32_s
    (f32.div
      (f32.const 120)     ;; screen height / 2.
      (local.get $t1))))  ;; distance along ray
Step 2: Drawing a wall
Now that we have the wall height, we need to draw the pixels for this column.
As a first test, it's easiest to just plot black for the ceiling and floor
(0xff000000 RGB 0,0,0 with full alpha) and white for the wall (0xffffffff).
We have to make sure we don't write data out-of-bounds, which can happen when
we're very close to a wall. To do so, we need to clamp the top of the wall
($miny) to 0 and the bottom of the wall ($maxy) to the screen height.
(local.set $miny (i32.sub (i32.const 120) (local.get $height)))
(local.set $maxy (i32.add (i32.const 120) (local.get $height)))

;; clamp miny and maxy
(if (i32.le_s (local.get $miny) (i32.const 0))
  (then (local.set $miny (i32.const 0))))
(if (i32.ge_s (local.get $maxy) (i32.const 240))
  (then (local.set $maxy (i32.const 240))))
If $miny is non-zero (i.e. we hit a wall), then we can loop from 0 down to
$miny to draw the ceiling, and from 240 up to $maxy to draw the floor. The
$addr and $bot-addr variables track the current pixel address for the
ceiling and floor respectively. The 0x3000 offset is the memory address of
the screen memory (for now, I ended up changing it later).
(if (local.get $miny)
  (then
    (local.set $y (local.get $miny))
    (loop $loop
      ;; draw ceiling (increment after)
      (i32.store offset=0x3000
        (local.get $addr)
        (i32.const 0xff000000))
      (local.set $addr (i32.add (local.get $addr) (i32.const 1280)))

      ;; draw-floor (decrement before)
      (local.set $bot-addr (i32.sub (local.get $bot-addr) (i32.const 1280)))
      (i32.store offset=0x3000
        (local.get $bot-addr)
        (i32.const 0xff000000))

      (br_if $loop
        (local.tee $y (i32.sub (local.get $y) (i32.const 1)))))))
Step 3: Shooting multiple rays
To draw a full wall and not just a column, we need to fire multiple rays. Each ray should start at the player location and point where the player is looking.
We need to decide what the field of view should be, and I arbitrarily picked 90°. To calculate each ray's direction (\(\textbf{d}\)), we start with the player's direction (\(\textbf{f}\)) and add (or subtract) a fraction of the vector that is perpendicular to that direction:
$$ \textbf{d} = \textbf{f} + \frac{x - 160}{160} \textbf{f}_\perp $$
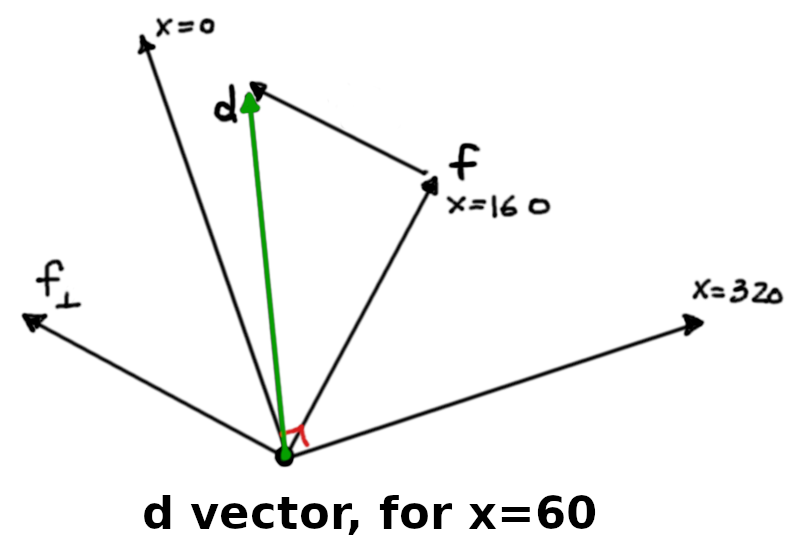
This means most rays will not have a length of 1. This is actually what we want for projection. If we normalize the ray, we'll get curved walls instead.
;; Loop for each column.
(loop $x-loop
  (local.set $xproj
    (f32.sub
      (f32.div
        (f32.convert_i32_s (local.get $x))
        (f32.const 160))
      (f32.const 1)))

    ...

    (local.set $dx
      (f32.add
        (local.get $fx)
        (f32.mul (local.get $xproj) (f32.neg (local.get $fy)))))
    (local.set $dy
      (f32.add
        (local.get $fy)
        (f32.mul (local.get $xproj) (local.get $fx))))

    ...
    ;; Fire each ray; see whether we hit the wall.
    ;; Draw the floor, ceiling and wall for this column

    ;; loop on x
    (br_if $x-loop
      (i32.lt_s
        (local.tee $x (i32.add (local.get $x) (i32.const 1)))
        (i32.const 320))))
Here's a demo of this in action! The code here also includes the ability to move around, which requires a little extra wasm and javascript code.
Progress!
Step 4: Multiple walls
As mentioned above, we can handle multiple walls by firing a ray against each one, and determining which hit is the closest.
This means we'll have to store each wall in an array. Let's create 4 walls to
start. Each one is stored as a f32 value, but the WebAssembly text format
doesn't let us write that directly. Instead, we have to encode the values
manually. Using Python's struct library helps:
>>> import struct
>>> print(''.join('\\%02x' % x for x in struct.pack('f', 12.0)))
\00\00\40\41
>>> print(''.join('\\%02x' % x for x in struct.pack('f', -12.0)))
\00\00\40\c1
For now, we can write these walls starting at address 0. The four values are the x and y coordinates of the wall's \(\textbf{a}\) and \(\textbf{b}\) points:
(data (i32.const 0)
  ;; top wall
  "\00\00\40\c1"  ;; ax = -12.0
  "\00\00\40\41"  ;; ay = +12.0
  "\00\00\40\41"  ;; bx = +12.0
  "\00\00\40\41"  ;; by = +12.0
  ;; right wall
  "\00\00\40\41"  ;; ax = +12.0
  "\00\00\40\41"  ;; ay = +12.0
  "\00\00\40\41"  ;; bx = +12.0
  "\00\00\40\c1"  ;; by = -12.0
  ;; bottom wall
  "\00\00\40\41"  ;; ax = +12.0
  "\00\00\40\c1"  ;; ay = -12.0
  "\00\00\40\c1"  ;; bx = -12.0
  "\00\00\40\c1"  ;; by = -12.0
  ;; left wall
  "\00\00\40\c1"  ;; ax = -12.0
  "\00\00\40\c1"  ;; ay = -12.0
  "\00\00\40\c1"  ;; bx = -12.0
  "\00\00\40\41"  ;; by = +12.0
)
Then we can add a loop over each wall, and record the minimum distance:
;; Initialize the minimum distance, and the starting wall address.
(local.set $mindist (f32.const inf))
(local.set $wall (i32.const 0))

;; For each wall...
(loop $wall-loop

  ;; Fire a ray against this wall.
  (local.set $dist
    (call $ray-line
      (local.get $dx)
      (local.get $dy)
      (f32.load (local.get $wall))
      (f32.load offset=4 (local.get $wall))
      (f32.load offset=8 (local.get $wall))
      (f32.load offset=12 (local.get $wall))))

  ;; Keep the smaller distance.
  (local.set $mindist
    (f32.min (local.get $mindist) (local.get $dist)))

 ;; 4 walls * 0x10 bytes per wall
  (br_if $wall-loop
    (i32.lt_s
      (local.tee $wall (i32.add (local.get $wall) (i32.const 0x10)))
      (i32.const 0x40))))
Here's the updated demo with four walls. These walls are just visual for now, they can't hold us back!
Step 5: Texturing
Let's give the walls some texture! First I created a 32 x 32 brick texture in gimp:

I could include this directly in the wasm file, but it would add \(32 \times 32 \times 4\text{ bytes per pixel} = 4096\text{ bytes}\) bytes to the file! Since it only has 4 colors, we can save space by storing it as 2 bits per pixel, and having a separate palette. That would reduce the size to:
$$ 32 \times 32 \times \frac{2\text{ bits per pixel} }{8\text{ bits per byte} } = 256\text{ bytes} \\ 4\text{ colors} \times 4\text{ bytes per color} = 16\text{ bytes} $$
which is OK for now.
To convert the image, I wrote a little python script. Working with PPM image files is really easy since it's a text format:
P3
# Created by GIMP version 2.10.12 PNM plug-in
32 32
255
0
0
0
...
It starts with a header, image width and height (32 and 32), the maximum channel value (255), then has RGB values for each pixel.
So we can convert the pixel data with the following code:
# Read file contents
data = open(args.file).readlines()

# Skip first 4 lines, convert the rest from string to int
data = map(int, data[4:])

# Helper function to group a list into tuples
groupinto = lambda l, n: [tuple(l[i:i+n]) for i in range(0, len(l), n)]

# Group int RGB tuples, e.g. [(0, 0, 0), (255, 255, 255), ...]
data = groupinto(data, 3)

# Get palette
colors = list(set(data))

# Map pixel data into palette index, e.g. [0, 1, 0, 2, 1, 1, 0, 1, ...]
data = [colors.index(x) for x in data]

# Group pixel data by 4, e.g. [(0, 1, 0, 2), (1, 1, 0, 1), ...]
data = groupinto(data, 4)

# Helper function for packing bits
combine = lambda l, shift: reduce(lambda x,y: (x<<shift)|y, l[::-1], 0)

# Combine 2 bit entries into an 1 byte, e.g. (0, 1, 0, 2) -> 0b10_00_01_00
data = [combine(x, 2) for x in data]
And include it in the .wat file:
;; brick texture 2bpp
(data (i32.const 0x400)
  "\aa\aa\aa\aa\aa\aa\aa\aa\00\00\00\00\02\00\00\00\ff\ff\ff\7f\f2\ff\ff\ff"
  "\ff\ff\ff\7f\f2\ff\ff\ff\fc\fc\fc\7c\f2\fc\fc\fc\f7\f7\f7\77\f2\f7\f7\f7"
  "\ff\ff\ff\7f\f2\ff\ff\ff\ff\ff\ff\7f\f2\ff\ff\ff\fc\fc\fc\7c\f2\fc\fc\fc"
  "\f7\f7\f7\77\f2\f7\f7\f7\ff\ff\ff\7f\f2\ff\ff\ff\ff\ff\ff\7f\f2\ff\ff\ff"
  "\fc\fc\fc\7c\f2\fc\fc\fc\f7\f7\f7\77\f2\f7\f7\f7\ff\ff\ff\7f\f2\ff\ff\ff"
  "\55\55\55\55\52\55\55\55\aa\aa\aa\aa\aa\aa\aa\aa\02\00\00\00\00\00\00\00"
  "\f2\ff\ff\ff\ff\ff\ff\7f\f2\ff\ff\ff\ff\ff\ff\7f\f2\fc\fc\fc\fc\fc\fc\7c"
  "\f2\f7\f7\f7\f7\f7\f7\77\f2\ff\ff\ff\ff\ff\ff\7f\f2\ff\ff\ff\ff\ff\ff\7f"
  "\f2\fc\fc\fc\fc\fc\fc\7c\f2\f7\f7\f7\f7\f7\f7\77\f2\ff\ff\ff\ff\ff\ff\7f"
  "\f2\ff\ff\ff\ff\ff\ff\7f\f2\fc\fc\fc\fc\fc\fc\7c\f2\f7\f7\f7\f7\f7\f7\77"
  "\f2\ff\ff\ff\ff\ff\ff\7f\52\55\55\55\55\55\55\55"
)

;; palette
(data (i32.const 0xd00)
  ;; brick palette
  "\f3\5f\5f\ff\79\0e\0e\ff\00\00\00\ff\9f\25\25\ff"
)
Now we need to draw the wall with the correct texture. We can add a function
called $texture that samples our brick texture, given a uv coordinate. The
return value will be a 32-bit integer color.
The first thing we need to do is convert the uv coordinate (in the range \([0, 1)\)) to a pixel coordinate (in the range \([0, 32)\)). It's also convenient if this function handles texture wrapping, so we can use it for texturing the ceiling and floor too.
We can do all of this with the following equation:
$$ x = \lfloor 32(u - \lfloor u \rfloor) \rfloor $$
Which can be written in wasm:
(func $frac-i32 (param $u f32) (result i32)
  (i32.trunc_f32_s
    (f32.mul
      (f32.sub (local.get $u) (f32.floor (local.get $u)))
      (f32.const 32))))
Now we can define a texture function that uses these coordinates:
(func $texture (param $u f32) (param $v f32) (result i32)
  (local $x i32)
  (local $y i32)

  (local.set $x (call $frac-i32 (local.get $u)))
  (local.set $y (call $frac-i32 (local.get $v)))

  ...
)
To get the palette entry, we can't use the normal equation \(yw + x\), since the pixels are packed 4 to a byte. Instead, we divide this index by 4, then shift the byte down and mask to extract the bits we want:
$$ \text{entry} = (\text{load}(\lfloor\frac{yw + x}{4}\rfloor) \gg 2(x \bmod 4)) \land 3 $$
since the width is 32, we can simplify this:
$$ \begin{array}{lcl} \text{entry} &=& (\text{load}(\lfloor\frac{32y + x}{4}\rfloor) \gg 2(x \bmod 4)) \land 3 \\ &=& (\text{load}(\lfloor\frac{32y}{4}\rfloor +\lfloor\frac{x}{4}\rfloor) \gg 2(x \bmod 4)) \land 3 \\ &=& (\text{load}(8y + \lfloor\frac{x}{4}\rfloor) \gg 2(x \bmod 4)) \land 3 \\ &=& (\text{load}((y \ll 3) + (x \gg 2)) \gg ((x \land 3) \ll 1)) \land 3 \end{array} $$
Which can be converted to wasm (using the texture address of 0x400):
(i32.and
  (i32.shr_u
    (i32.load8_u offset=0x400
      (i32.add (i32.shl (local.get $y) (i32.const 3))
               (i32.shr_u (local.get $x) (i32.const 2))))
    (i32.shl (i32.and (local.get $x) (i32.const 3)) (i32.const 1)))
  (i32.const 3))
Then we can read from this palette entry to get the RGBA color. The entry must be left-shifted by 2 since it is 4 bytes per entry:
(i32.load offset=0xd00
  (i32.shl <palette entry> (i32.const 2))))
Now we need to get the uv coordinates of the wall. The u coordinate is easy: it
is the $t2 value we got from the intersection test. The v coordinate should
go from 0 at the top of the wall to 1 at the bottom. So we can convert from the
pixel location to a v coordinate with this equation, where h is actually the
half-height of the wall in pixels:
$$ v = \frac{y - (120 - h)}{2h} $$
So the new code for drawing a wall pixel is:
(i32.store offset=0x3000
  (local.get $addr)
  (call $texture
    ;; u coordinate
    (local.get $mint2)
    ;; v coordinate
    (f32.div
      (f32.convert_i32_s
        (i32.sub
          (local.get $y)
          (i32.sub (i32.const 120) (local.get $height))))
      (f32.convert_i32_s
        (i32.mul (local.get $height) (i32.const 2))))))
Finally, we can try it out!
Did you notice that the texture is doubled up? We can add a single line to
$frac-i32 to do this:
(func $frac-i32 (param $u f32) (result i32)
  (local.set $u (f32.add (local.get $u) (local.get $u)))
  ...)
This post is getting pretty long already! In the next one I'll add:
- Texturing the floor and ceiling
- Shrinking the texture further with RLE compression
- Randomly generating a maze